Programming a 128 X 64 Blue and Yellow Oled Arduino
Bored of using LCD display in you Arduino projects again and again? Well! They are indeed a thing of past. Enter the super-cool OLED (Organic Light-Emitting Diode) displays! They're super-light, almost paper-thin, theoretically flexible, and produce a brighter and crisper picture.
SSD1306 OLED Driver & its interfaces
At the heart of the module is a powerful single-chip CMOS OLED driver controller – SSD1306. It can communicate with the microcontroller in multiple ways including I2C and SPI.
SPI is generally faster than I2C but requires more I/O pins. While I2C requires only two pins and can be shared with other I2C peripherals. It's a trade-off between pins and speed. So, it really boils down to your choice.
Thanks to the SSD1306 controller's versatility, the module comes in different sizes and colors: for example128x64, 128×32, with white OLEDs, Blue OLEDs and Dual Color OLEDs. The good news is that all of these displays are swappable.
Power Supply Requirement
An OLED display works without a backlight because it makes its own light. This is why the display has such high contrast, extremely wide viewing angle and can display deep black levels. Absence of backlight significantly reduces the power required to run the OLED. On average the display uses about 20mA current, although it depends on how much of the display is lit.
The operating voltage of the SSD1306 controller is from 1.65V to 3.3V while OLED panel requires 7V to 15V supply voltage. All these different power requirements are sufficed using internal charge pump circuitry. This makes it possible to connect it to an Arduino or any 5V logic microcontroller easily without using any logic level converter.
OLED Memory Map
Regardless of the size of the OLED module, the SSD1306 driver has a built-in 1KB Graphic Display Data RAM (GDDRAM) for the screen which holds the bit pattern to be displayed. This 1K memory area is organized in 8 pages (from 0 to 7). Each page contains 128 columns/segments (block 0 to 127). And each column can store 8 bits of data (from 0 to 7). That surely tells us we have
8 pages x 128 segments x 8 bits of data = 8192 bits = 1024 bytes = 1KB memory
The whole 1K memory with pages, segments and data is highlighted below.
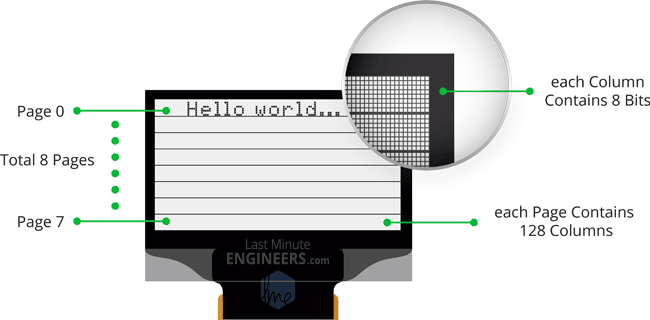
Each bit represents particular OLED pixel on the screen which can be turned ON or OFF programmatically.
The 128×64 OLED screen displays all the contents of RAM whereas 128×32 OLED screen displays only 4 pages (half content) of RAM.
Here are the complete specifications:
OLED Display Module Pinout
Before diving into hookup and example code, let's first take a look at its Pinout.
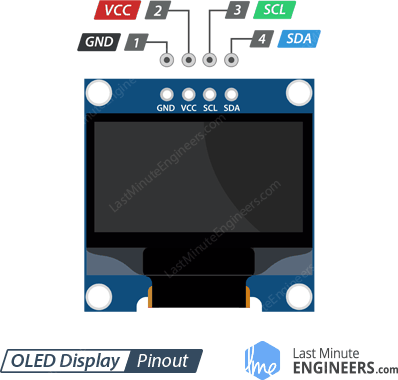
GND should be connected to the ground of Arduino
VCC is the power supply for the display which we connect the 5 volts pin on the Arduino.
SCL is a serial clock pin for I2C interface.
SDA is a serial data pin for I2C interface.
Wiring OLED display module to Arduino Uno
Before we get to uploading code and sending data to the display, let's hook the display up to the Arduino.
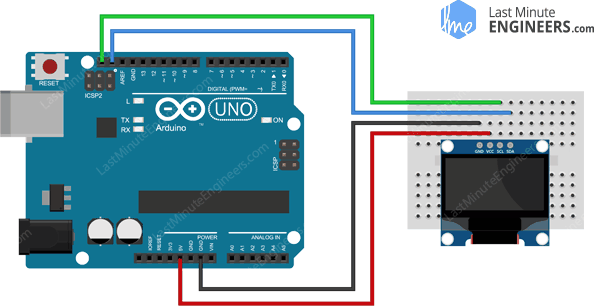
Connections are fairly simple. Start by connecting VCC pin to the 5V output on the Arduino and connect GND to ground.
Now we are remaining with the pins that are used for I2C communication. Note that each Arduino Board has different I2C pins which should be connected accordingly. On the Arduino boards with the R3 layout, the SDA (data line) and SCL (clock line) are on the pin headers close to the AREF pin. They are also known as A5 (SCL) and A4 (SDA).
If you have a Mega, the pins are different! You'll want to use digital 21 (SCL) and 20 (SDA). Refer below table for quick understanding.
The following diagram shows you how to wire everything.
Installing Library for OLED Display Module
The SSD1306 controller of the OLED display has flexible yet complex drivers. Vast knowledge on memory addressing is required in order to use the SSD1306 controller. Fortunately, Adafruit's SSD1306 library was written to hide away the complexities of the SSD1306 controller so that we can issue simple commands to control the display.
To install the library navigate to the Sketch > Include Library > Manage Libraries… Wait for Library Manager to download libraries index and update list of installed libraries.
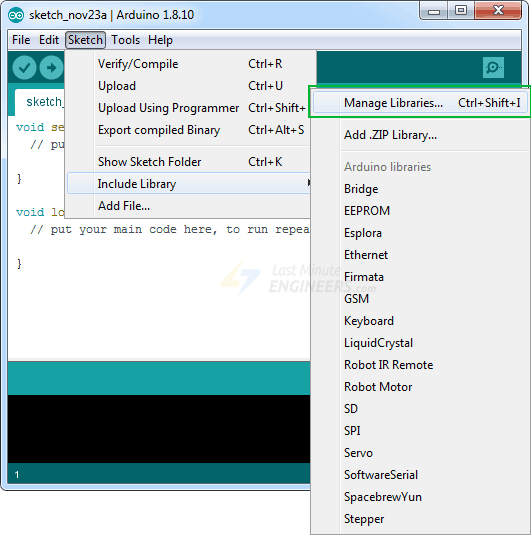
Filter your search by typing 'adafruit ssd1306'. There should be a couple entries. Look for Adafruit SSD1306 by Adafruit. Click on that entry, and then select Install.
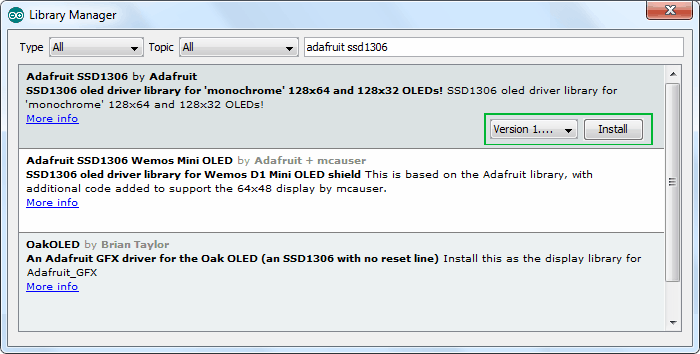
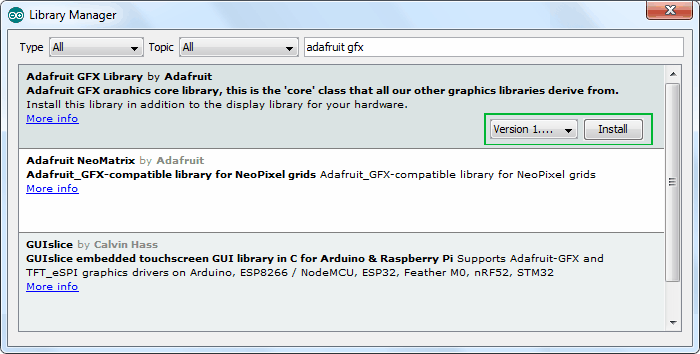
This Adafruit SSD1306 library is a hardware-specific library which handles lower-level functions. It needs to be paired with Adafruit GFX Library to display graphics primitives like points, lines, circles, rectangles etc. Install this library as well.
Known Problem with SSD1306 Controller
Although the SSD1306 has a built-in GDDRAM for the screen, we cannot read the contents of it (according to Adafruit). Therefore, it is not possible to manipulate the screen buffer to perform mathematical operations.
As an alternative, the library allocates 1KB (128×64)/8 bits) of memory from ATmega328P as buffer. So, it can manipulate the screen buffer and then perform a bulk transfer from the ATmega328P's memory to the internal memory of the SSD1306 controller.
Modifying Adafruit SSD1306 Library
Adafruit's SSD1306 Library isn't set up for the 128×64 OLED displays (the one we are using right now). The display size must be changed in the Adafruit_SSD1306.h header file to make it work for us. If it is not changed, an error message saying #error ("Height incorrect, please fix Adafruit_SSD1306.h!"); may appear when attempting to verify the example sketch in the Arduino IDE:

In order to change the Adafruit_SSD1306.h header file, open your sketchbook location. It's generally My Documents > Arduino. Now go to libraries > Adafruit_SSD1306
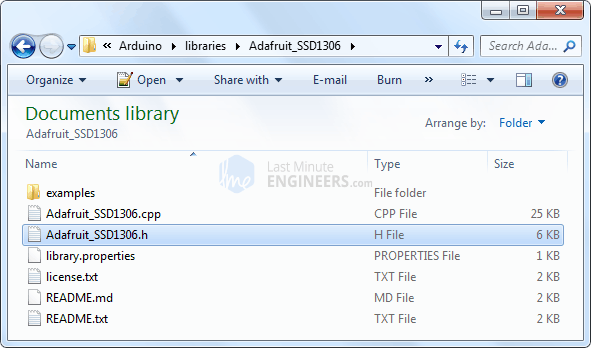
Open Adafruit_SSD1306.h file in a text editor. Scroll down the file to find the section with the SSD1306 Displays or directly go to line no. 73. Comment out #define SSD1306_128_32 and uncomment #define SSD1306_128_64 so that the code in this section looks like this:
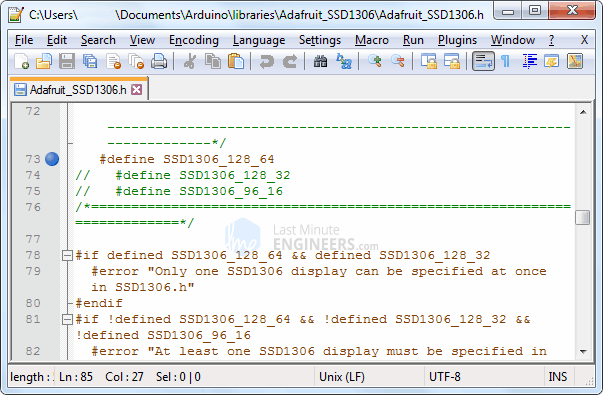
That's it. Now save the file and restart your Arduino IDE.
Arduino Code – Displaying Text
Now comes the interesting stuff!
The following test sketch will print 'Hello World!' message on the display. It also includes
- Displaying Inverted text
- Displaying Numbers
- Displaying Numbers with base (Hex, Dec)
- Displaying ASCII symbols
- Scrolling Text Horizontally & Vertically
- Scrolling part of the display
This will give you complete understanding about how to use the OLED display and can serve as the basis for more practical experiments and projects. Try the sketch out and then we will dissect it in some detail.
When building the sketch, the IDE will display a low memory warning message. This is because the library allocates 1KB of memory from ATmega328P as display buffer. You can ignore it.
#include <SPI.h> #include <Wire.h> #include <Adafruit_GFX.h> #include <Adafruit_SSD1306.h> Adafruit_SSD1306 display(-1); void setup() { // initialize with the I2C addr 0x3C display.begin(SSD1306_SWITCHCAPVCC, 0x3C); // Clear the buffer. display.clearDisplay(); // Display Text display.setTextSize(1); display.setTextColor(WHITE); display.setCursor(0,28); display.println("Hello world!"); display.display(); delay(2000); display.clearDisplay(); // Display Inverted Text display.setTextColor(BLACK, WHITE); // 'inverted' text display.setCursor(0,28); display.println("Hello world!"); display.display(); delay(2000); display.clearDisplay(); // Changing Font Size display.setTextColor(WHITE); display.setCursor(0,24); display.setTextSize(2); display.println("Hello!"); display.display(); delay(2000); display.clearDisplay(); // Display Numbers display.setTextSize(1); display.setCursor(0,28); display.println(123456789); display.display(); delay(2000); display.clearDisplay(); // Specifying Base For Numbers display.setCursor(0,28); display.print("0x"); display.print(0xFF, HEX); display.print("(HEX) = "); display.print(0xFF, DEC); display.println("(DEC)"); display.display(); delay(2000); display.clearDisplay(); // Display ASCII Characters display.setCursor(0,24); display.setTextSize(2); display.write(3); display.display(); delay(2000); display.clearDisplay(); // Scroll full screen display.setCursor(0,0); display.setTextSize(1); display.println("Full"); display.println("screen"); display.println("scrolling!"); display.display(); display.startscrollright(0x00, 0x07); delay(2000); display.stopscroll(); delay(1000); display.startscrollleft(0x00, 0x07); delay(2000); display.stopscroll(); delay(1000); display.startscrolldiagright(0x00, 0x07); delay(2000); display.startscrolldiagleft(0x00, 0x07); delay(2000); display.stopscroll(); display.clearDisplay(); // Scroll part of the screen display.setCursor(0,0); display.setTextSize(1); display.println("Scroll"); display.println("some part"); display.println("of the screen."); display.display(); display.startscrollright(0x00, 0x00); } void loop() {} The sketch starts by including four libraries viz. SPI.h, Wire.h, Adafruit_GFX.h and Adafruit_SSD1306.h. Although SPI.h library is not required for I2C OLED displays, we need to add it for the sake of compiling our program.
#include <SPI.h> #include <Wire.h> #include <Adafruit_GFX.h> #include <Adafruit_SSD1306.h> Next, we need to create an object of Adafruit_SSD1306.h. The Adafruit_SSD1306 constructor accepts Arduino pin number to which reset pin of the display is connected. As the OLED display we are using doesn't have a RESET pin, we will send -1 to the constructor so that none of the Arduino pins is used as a reset for the display.
Adafruit_SSD1306 display(-1); In setup function: we need to initialize the OLED object using begin() function. The function takes two parameters. First parameter SSD1306_SWITCHCAPVCC turns the internal charge pump circuitry ON while second parameter provides I2C address of the OLED display. I2C address of such OLED display module is generally 0x3C. It's fixed and cannot be changed.
Next, we clear the buffer before printing our first message on the screen.
// initialize with the I2C addr 0x3C display.begin(SSD1306_SWITCHCAPVCC, 0x3C); // Clear the buffer. display.clearDisplay(); Displaying simple Text (Hello World)
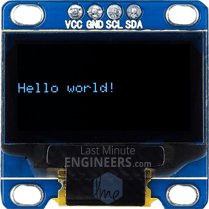
// Display Text display.clearDisplay(); display.setTextSize(1); display.setTextColor(WHITE); display.setCursor(0,28); display.println("Hello world!"); display.display(); delay(2000); For displaying text on the screen, we need to set the font size. This can be done by calling setTextSize() and passing font size (starting from 1) as a parameter.
Next, we need to set the font color by calling function setTextColor() . Pass parameter WHITE for the dark background and pass BLACK for bright background. Now before printing the message we need to set the cursor position by calling function setCursor(X,Y). Pixels on the screen are addressed by their horizontal (X) and vertical (Y) coordinates. The coordinate system places the origin (0,0) at the top left corner, with positive X increasing to the right and positive Y increasing downward.
We can use simple print(" ") or println(" ") function to print the message on the screen just like we print data on serial monitor. Remember, println() will move the cursor to the new line.
In order for the library to perform extremely fast mathematical operations on the screen buffer (more than 100 frames per second), calls to the print functions do not immediately transfer the contents of screen buffer to the SSD1306 controller. A display() command is required to instruct the library to perform the bulk transfer from the screen buffer in the ATmega328P to the internal memory of the SSD1306 controller. As soon as the memory is being transferred, the pixels corresponding to the screen buffer will show up on the OLED display.
Displaying Inverted Text
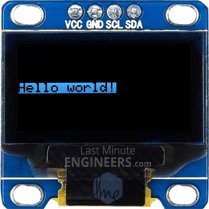
// Display Inverted Text display.clearDisplay(); display.setTextColor(BLACK, WHITE); // 'inverted' text display.setCursor(0,28); display.println("Hello world!"); display.display(); delay(2000); For displaying inverted text, we will call setTextColor(FontColor,BackgroundColor) function again. If you are paying attention, you know we passed only one parameter to this function earlier, but now we are passing two parameters. This is possible because of something called function overloading. Function overloading is the ability to create multiple functions of the same name but with different set of parameters. Calls to an overloaded function will run a specific implementation of that function depending upon the parameters passed.
In our case passing setTextColor(BLACK, WHITE) will render black text on filled background.
Scaling Font Size
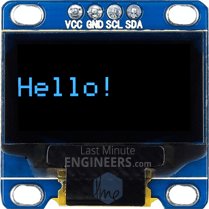
// Changing Font Size display.clearDisplay(); display.setTextColor(WHITE); display.setCursor(0,24); display.setTextSize(2); display.println("Hello!"); display.display(); delay(2000); Earlier in this tutorial, we called setTextSize() function to set font size and passed 1 as parameter. You can use this function to scale the font by passing any non-negative integer.
Characters are rendered in the ratio of 7:10. Meaning, passing font size 1 will render the text at 7×10 pixels per character, passing 2 will render the text at 14×20 pixels per character and so on.
The Adafruit_GFX library is responsible for rendering font. By default the mono-spaced font is selected. However, more recent versions of the Adafruit GFX library offer the ability to use alternate fonts. Several alternate fonts come with the library, plus there's the ability to add new ones.
Displaying Numbers
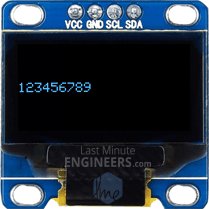
// Display Numbers display.clearDisplay(); display.setTextSize(1); display.setCursor(0,28); display.println(123456789); display.display(); delay(2000); Numbers can be displayed on the OLED display by just calling print() or println() function. An overloaded implementation of these functions accepts 32-bit unsigned int, so you can only display numbers from 0 to 4,294,967,295.
Specifying Base For Numbers
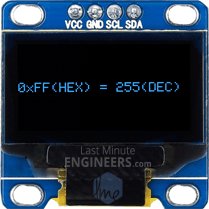
// Specifying Base For Numbers display.clearDisplay(); display.setCursor(0,28); display.print("0x"); display.print(0xFF, HEX); display.print("(HEX) = "); display.print(0xFF, DEC); display.println("(DEC)"); display.display(); delay(2000); The print() & println() functions has optional second parameter that specifies the base (format) to use; permitted values are BIN (binary, or base 2), OCT (octal, or base 8), DEC (decimal, or base 10), HEX (hexadecimal, or base 16). For floating point numbers, this parameter specifies the number of decimal places to use. For example:
- print(78, BIN) gives "1001110"
- print(78, OCT) gives "116"
- print(78, DEC) gives "78"
- print(78, HEX) gives "4E"
- println(1.23456, 0) gives "1"
- println(1.23456, 2) gives "1.23"
- println(1.23456, 4) gives "1.2346"
Displaying ASCII Symbols
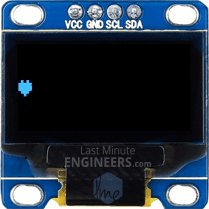
// Display ASCII Characters display.clearDisplay(); display.setCursor(0,24); display.setTextSize(2); display.write(3); display.display(); delay(2000); The print() & println() functions send data to the display as human-readable ASCII text while write() function sends binary data to the display. So, you can use this function to display ASCII symbols. In our example sending number 3 will display heart symbol.
Full Screen Scrolling
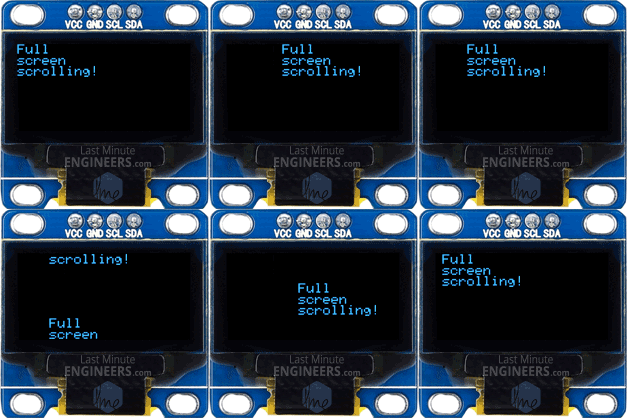
// Scroll full screen display.clearDisplay(); display.setCursor(0,0); display.setTextSize(1); display.println("Full"); display.println("screen"); display.println("scrolling!"); display.display(); display.startscrollright(0x00, 0x07); delay(2000); display.stopscroll(); delay(1000); display.startscrollleft(0x00, 0x07); delay(2000); display.stopscroll(); delay(1000); display.startscrolldiagright(0x00, 0x07); delay(2000); display.startscrolldiagleft(0x00, 0x07); delay(2000); display.stopscroll(); You can scroll the display horizontally by calling startscrollright() & startscrollleft() functions and diagonally by calling startscrolldiagright() & startscrolldiagleft(). All these functions accept two parameters viz. start page and stop page. Refer to OLED Memory Map section for explanation of the pages. As there are eight pages in the display from 0 to 7, you can scroll entire screen by scrolling all the pages i.e. passing parameters 0x00 and 0x07.
To stop display from scrolling you can use stopscroll() function.
Scrolling Specific Part
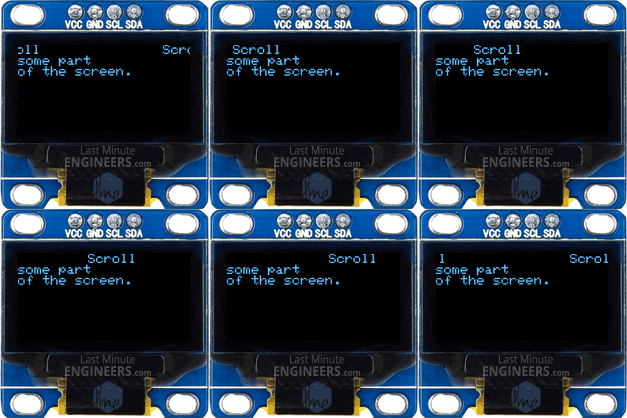
// Scroll part of the screen display.setCursor(0,0); display.setTextSize(1); display.println("Scroll"); display.println("some part"); display.println("of the screen."); display.display(); display.startscrollright(0x00, 0x00); Sometimes we don't want to scroll entire display. You can do that by passing proper start page and stop page information to scrolling functions. Refer to OLED Memory Map section for explanation of the pages. As there are eight pages in the display from 0 to 7, you can scroll some part of the screen by passing specific page numbers as parameters.
In our example, we passed both the parameters as 0x00. This will scroll only first page (first 8 rows) of the display.
Arduino Code – Basic Drawings
In this example, we're going to try some basic drawings. This sketch demonstrates many drawing functions, including rectangles, round rectangles, circles and triangles. Try the sketch out and then we will dissect it in some detail.
#include <SPI.h> #include <Wire.h> #include <Adafruit_GFX.h> #include <Adafruit_SSD1306.h> Adafruit_SSD1306 display(-1); void setup() { // initialize with the I2C addr 0x3C display.begin(SSD1306_SWITCHCAPVCC, 0x3C); // Clear the buffer. display.clearDisplay(); display.setTextSize(1); display.setTextColor(WHITE); display.setCursor(0,0); display.println("Rectangle"); display.drawRect(0, 15, 60, 40, WHITE); display.display(); delay(2000); display.clearDisplay(); display.setTextSize(1); display.setTextColor(WHITE); display.setCursor(0,0); display.println("Filled Rectangle"); display.fillRect(0, 15, 60, 40, WHITE); display.display(); delay(2000); display.clearDisplay(); display.setTextSize(1); display.setTextColor(WHITE); display.setCursor(0,0); display.println("Round Rectangle"); display.drawRoundRect(0, 15, 60, 40, 8, WHITE); display.display(); delay(2000); display.clearDisplay(); display.setTextSize(1); display.setTextColor(WHITE); display.setCursor(0,0); display.println("Filled Round Rectangl"); display.fillRoundRect(0, 15, 60, 40, 8, WHITE); display.display(); delay(2000); display.clearDisplay(); display.setTextSize(1); display.setTextColor(WHITE); display.setCursor(0,0); display.println("Circle"); display.drawCircle(20, 35, 20, WHITE); display.display(); delay(2000); display.clearDisplay(); display.setTextSize(1); display.setTextColor(WHITE); display.setCursor(0,0); display.println("Filled Circle"); display.fillCircle(20, 35, 20, WHITE); display.display(); delay(2000); display.clearDisplay(); display.setTextSize(1); display.setTextColor(WHITE); display.setCursor(0,0); display.println("Triangle"); display.drawTriangle(30, 15, 0, 60, 60, 60, WHITE); display.display(); delay(2000); display.clearDisplay(); display.setTextSize(1); display.setTextColor(WHITE); display.setCursor(0,0); display.println("Filled Triangle"); display.fillTriangle(30, 15, 0, 60, 60, 60, WHITE); display.display(); delay(2000); display.clearDisplay(); } void loop() {} Most of the code (Including libraries and initializing display) is same as above code example, except following code snippets to draw basic drawings.
Drawing Rectangle
display.clearDisplay(); display.setTextSize(1); display.setTextColor(WHITE); display.setCursor(0,0); display.println("Rectangle"); display.drawRect(0, 15, 60, 40, WHITE); display.display(); delay(2000); display.clearDisplay(); display.setTextSize(1); display.setTextColor(WHITE); display.setCursor(0,0); display.println("Filled Rectangle"); display.fillRect(0, 15, 60, 40, WHITE); display.display(); delay(2000); You can draw rectangle on the display by using drawRect() function. The function takes five parameters viz. X coordinate, Y coordinate, Width, Height and color. Actually this function draws hollow rectangle with 1 pixel border. You can draw filled rectangle using fillRect() function.
Drawing Round Rectangle
display.clearDisplay(); display.setTextSize(1); display.setTextColor(WHITE); display.setCursor(0,0); display.println("Round Rectangle"); display.drawRoundRect(0, 15, 60, 40, 8, WHITE); display.display(); delay(2000); display.clearDisplay(); display.setTextSize(1); display.setTextColor(WHITE); display.setCursor(0,0); display.println("Filled Round Rectangl"); display.fillRoundRect(0, 15, 60, 40, 8, WHITE); display.display(); delay(2000); You can draw round rectangle on the display by using drawRoundRect() function. This function takes same parameters as drawRect() function except one additional parameter – Radius of corner rounding. Actually this function draws hollow round rectangle with 1 pixel border. You can draw filled round rectangle using fillRoundRect() function.
Drawing Circle
display.clearDisplay(); display.setTextSize(1); display.setTextColor(WHITE); display.setCursor(0,0); display.println("Circle"); display.drawCircle(20, 35, 20, WHITE); display.display(); delay(2000); display.clearDisplay(); display.setTextSize(1); display.setTextColor(WHITE); display.setCursor(0,0); display.println("Filled Circle"); display.fillCircle(20, 35, 20, WHITE); display.display(); delay(2000); You can draw circle on the display by using drawCircle() function. The function takes four parameters viz. X coordinate of center, Y coordinate of center, radius and color. This function draws hollow circle with 1 pixel border. You can draw filled circle using fillCircle() function.
Drawing Triangle
display.clearDisplay(); display.setTextSize(1); display.setTextColor(WHITE); display.setCursor(0,0); display.println("Triangle"); display.drawTriangle(30, 15, 0, 60, 60, 60, WHITE); display.display(); delay(2000); display.clearDisplay(); display.setTextSize(1); display.setTextColor(WHITE); display.setCursor(0,0); display.println("Filled Triangle"); display.fillTriangle(30, 15, 0, 60, 60, 60, WHITE); display.display(); delay(2000); You can draw triangle on the display by using drawTriangle() function. The function takes seven parameters viz. 3 X & Y coordinates (x0, y0, x1, y1, x2 & y2) of vertices of triangle and color. (X0,y0) represents top vertex, (x1,y1) represents left vertex and (x2,y2) represents right vertex.
This function draws hollow triangle with 1 pixel border. You can draw filled triangle using fillTriangle() function.
Arduino Code – Displaying Bitmap
This last example shows how to draw bitmap images to the OLED Display. This is useful for creating splash screens of company logos, making sprites or just creating fun graphics for displaying information. Copy the following code, paste it into the Arduino IDE and click upload.
#include <SPI.h> #include <Wire.h> #include <Adafruit_GFX.h> #include <Adafruit_SSD1306.h> Adafruit_SSD1306 display(-1); // Bitmap of MarilynMonroe Image const unsigned char MarilynMonroe [] PROGMEM = { 0xff, 0xff, 0xff, 0xff, 0xff, 0xf8, 0x1f, 0xff, 0xff, 0xff, 0xff, 0xff, 0xff, 0xff, 0xff, 0xff, 0xff, 0xff, 0xff, 0xff, 0xff, 0xc0, 0x1f, 0xff, 0xff, 0xf0, 0x41, 0xff, 0xff, 0xff, 0xff, 0xff, 0xff, 0xff, 0xff, 0xff, 0xff, 0x80, 0x7f, 0xff, 0xff, 0xf8, 0x03, 0xff, 0xff, 0xff, 0xff, 0xff, 0xff, 0xff, 0xff, 0xff, 0xff, 0xf9, 0xff, 0xff, 0xff, 0xe0, 0x07, 0xff, 0xff, 0xff, 0xff, 0xff, 0xff, 0xff, 0xff, 0xff, 0xff, 0x87, 0xff, 0xff, 0xff, 0xf8, 0x03, 0xff, 0xff, 0xff, 0xff, 0xff, 0xff, 0xff, 0xff, 0xff, 0xff, 0x07, 0xff, 0xff, 0xff, 0xf8, 0x01, 0xf1, 0xff, 0xff, 0xff, 0xff, 0xff, 0xff, 0xff, 0xff, 0xff, 0x9f, 0xff, 0xff, 0xff, 0xf8, 0x00, 0xf8, 0xff, 0xff, 0xff, 0xff, 0xff, 0xff, 0xff, 0xff, 0xff, 0xbf, 0xff, 0xff, 0xff, 0xfc, 0x02, 0x78, 0x7f, 0xff, 0xff, 0xff, 0xff, 0xff, 0xff, 0xff, 0xff, 0xfc, 0x3f, 0xff, 0xff, 0xfe, 0x03, 0x7c, 0x1f, 0xff, 0xff, 0xff, 0xff, 0xff, 0xff, 0xff, 0xff, 0xf0, 0x07, 0xff, 0xff, 0xfe, 0x01, 0xfe, 0x1f, 0xff, 0xff, 0xff, 0xff, 0xff, 0xff, 0xff, 0xfd, 0xe0, 0x03, 0xff, 0xff, 0xfc, 0x00, 0xfe, 0x0f, 0xff, 0xff, 0xff, 0xff, 0xff, 0xff, 0xff, 0xfe, 0x87, 0xe0, 0xff, 0xff, 0xfc, 0x00, 0x06, 0x07, 0xff, 0xff, 0xff, 0xff, 0xff, 0xff, 0xff, 0xfc, 0x1f, 0xf9, 0xff, 0xff, 0xfc, 0x00, 0x02, 0x07, 0xff, 0xff, 0xff, 0xff, 0xff, 0xff, 0xff, 0xf8, 0x1f, 0xff, 0xff, 0xff, 0xfc, 0x00, 0xc3, 0xc3, 0xff, 0xff, 0xff, 0xff, 0xff, 0xff, 0xff, 0xf0, 0x3f, 0xff, 0xff, 0xe0, 0x0c, 0x00, 0xe7, 0x81, 0xff, 0xff, 0xff, 0xff, 0xff, 0xff, 0xff, 0xf0, 0x0f, 0xff, 0xff, 0xe0, 0x02, 0x00, 0x02, 0x00, 0xff, 0xff, 0xff, 0xff, 0xff, 0xff, 0xff, 0xf0, 0x0f, 0xff, 0xff, 0xe0, 0x01, 0x00, 0x00, 0x00, 0x3f, 0xff, 0xff, 0xff, 0xff, 0xff, 0xff, 0x80, 0x00, 0x3f, 0xff, 0xff, 0xe0, 0x00, 0x00, 0x1e, 0x3f, 0xff, 0xff, 0xff, 0xff, 0xff, 0xfc, 0x00, 0x00, 0x0f, 0xff, 0x3f, 0xf8, 0x00, 0x18, 0x7f, 0x1f, 0xff, 0xff, 0xff, 0xff, 0xff, 0xf8, 0x01, 0x80, 0x03, 0xfc, 0x3f, 0xfc, 0x00, 0x70, 0xfe, 0x1f, 0xff, 0xff, 0xff, 0xff, 0xff, 0xf0, 0x43, 0xff, 0xff, 0xf8, 0x7f, 0xf8, 0x00, 0x00, 0x7e, 0x1f, 0xff, 0xff, 0xff, 0xff, 0xff, 0xe0, 0x07, 0xff, 0xff, 0xf0, 0xff, 0xfc, 0x00, 0x00, 0x7c, 0x3f, 0xff, 0xff, 0xff, 0xff, 0xff, 0xe0, 0x0f, 0xff, 0xff, 0xf1, 0xef, 0xf8, 0x00, 0x01, 0xfc, 0x3f, 0xff, 0xff, 0xff, 0xff, 0xff, 0xe4, 0xff, 0xff, 0xff, 0xf3, 0x80, 0xa0, 0x00, 0x07, 0xfc, 0xaf, 0xff, 0xff, 0xff, 0xff, 0xff, 0xec, 0x5f, 0xff, 0xff, 0xe7, 0xf0, 0x00, 0x00, 0x03, 0xfe, 0xdf, 0xff, 0xff, 0xff, 0xff, 0xff, 0xee, 0x7f, 0xff, 0xff, 0xc7, 0xf8, 0x00, 0x00, 0x03, 0xff, 0xdf, 0xff, 0xff, 0xff, 0xff, 0xff, 0xfe, 0x7f, 0xff, 0xf7, 0xc7, 0xff, 0x06, 0x00, 0x03, 0xff, 0xbf, 0xff, 0xff, 0xff, 0xff, 0xff, 0xfe, 0x5f, 0xff, 0xc7, 0x07, 0xff, 0x80, 0x00, 0x07, 0xdb, 0xbf, 0xff, 0xff, 0xff, 0xff, 0xff, 0xee, 0xff, 0xff, 0x80, 0x03, 0xff, 0xc0, 0x00, 0x03, 0xc3, 0x0f, 0xff, 0xff, 0xff, 0xff, 0xff, 0xfe, 0xff, 0xff, 0x98, 0x03, 0xff, 0xf8, 0x00, 0x07, 0xe0, 0x0f, 0xff, 0xff, 0xff, 0xff, 0xff, 0xef, 0xff, 0xff, 0xf8, 0x01, 0xff, 0xfc, 0x01, 0x07, 0xfc, 0x1f, 0xff, 0xff, 0xff, 0xff, 0xff, 0xcf, 0xef, 0xff, 0xff, 0xe1, 0xff, 0xfc, 0x01, 0x07, 0xf8, 0x1f, 0xff, 0xff, 0xff, 0xff, 0xff, 0x9f, 0xff, 0xff, 0x7f, 0xf1, 0xff, 0xf8, 0x02, 0x07, 0x88, 0x3f, 0xff, 0xff, 0xff, 0xff, 0xff, 0xcf, 0xef, 0xf8, 0x0f, 0xff, 0xff, 0xe0, 0x00, 0x07, 0x84, 0x3f, 0xff, 0xff, 0xff, 0xff, 0xff, 0xe7, 0xef, 0xf0, 0x04, 0x7f, 0xff, 0xc0, 0x00, 0x07, 0x84, 0x7f, 0xff, 0xff, 0xff, 0xff, 0xff, 0x3f, 0xff, 0xe0, 0x00, 0x1f, 0xff, 0x80, 0x00, 0x06, 0x04, 0xff, 0xff, 0xff, 0xff, 0xff, 0xff, 0x3f, 0x7f, 0xe1, 0xf0, 0x07, 0xff, 0x80, 0x00, 0x07, 0x06, 0xff, 0xff, 0xff, 0xff, 0xff, 0xff, 0xff, 0xff, 0xc3, 0xfe, 0x03, 0xff, 0x00, 0x00, 0x03, 0x80, 0xff, 0xff, 0xff, 0xff, 0xff, 0xff, 0xf2, 0x3f, 0xc6, 0x7f, 0x81, 0xce, 0x00, 0x00, 0x01, 0xc1, 0xff, 0xff, 0xff, 0xff, 0xff, 0xff, 0xe0, 0x3f, 0xc0, 0x07, 0xc1, 0xfe, 0x00, 0x00, 0x0d, 0xc0, 0x7f, 0xff, 0xff, 0xff, 0xff, 0xff, 0xe0, 0x3f, 0xc0, 0x01, 0xe0, 0xfc, 0x00, 0x00, 0x0f, 0xc0, 0x7f, 0xff, 0xff, 0xff, 0xff, 0xff, 0xc0, 0x3f, 0xc0, 0x00, 0x50, 0xfc, 0x00, 0x00, 0x0e, 0xc0, 0xff, 0xff, 0xff, 0xff, 0xff, 0xff, 0xc0, 0x3f, 0xc0, 0x00, 0x18, 0xf8, 0x00, 0x00, 0x0e, 0xc1, 0xff, 0xff, 0xff, 0xff, 0xff, 0xff, 0xc0, 0x3f, 0xc0, 0x00, 0x00, 0xf8, 0x00, 0x00, 0x66, 0x81, 0xff, 0xff, 0xff, 0xff, 0xff, 0xff, 0xc0, 0x1f, 0xc7, 0x80, 0x00, 0xf8, 0x00, 0x01, 0xe0, 0x00, 0xff, 0xff, 0xff, 0xff, 0xff, 0xff, 0xc0, 0x1f, 0xc1, 0xe0, 0x01, 0xf8, 0x00, 0x03, 0xf0, 0x01, 0xff, 0xff, 0xff, 0xff, 0xff, 0xff, 0x80, 0x1f, 0xc0, 0x3e, 0x03, 0xf0, 0x00, 0x00, 0xe0, 0x03, 0xff, 0xff, 0xff, 0xff, 0xff, 0xff, 0x00, 0x1f, 0xe0, 0xe0, 0x03, 0xf2, 0x00, 0x00, 0xc0, 0x03, 0xff, 0xff, 0xff, 0xff, 0xff, 0xff, 0x80, 0x1f, 0xf0, 0x00, 0x07, 0xe6, 0x00, 0x00, 0xc0, 0x03, 0xff, 0xff, 0xff, 0xff, 0xff, 0xff, 0x80, 0x1f, 0xff, 0x00, 0x1f, 0xee, 0x00, 0x00, 0x80, 0x07, 0xff, 0xff, 0xff, 0xff, 0xff, 0xff, 0xb8, 0x0f, 0xff, 0xf0, 0x3f, 0xdc, 0x00, 0x00, 0x00, 0x0f, 0xff, 0xff, 0xff, 0xff, 0xff, 0xff, 0xbc, 0x0f, 0xff, 0xff, 0xff, 0xdc, 0x00, 0x00, 0x00, 0x0f, 0xff, 0xff, 0xff, 0xff, 0xff, 0xff, 0x9e, 0x0f, 0xff, 0xff, 0xff, 0xf8, 0x00, 0x00, 0x00, 0x1f, 0xff, 0xff, 0xff, 0xff, 0xff, 0xff, 0x08, 0x0f, 0xff, 0xff, 0xff, 0x70, 0x00, 0x00, 0x00, 0x1f, 0xff, 0xff, 0xff, 0xff, 0xff, 0xff, 0x00, 0x0b, 0xff, 0xff, 0xfe, 0xe0, 0x00, 0x00, 0x00, 0x1f, 0xff, 0xff, 0xff, 0xff, 0xff, 0xff, 0x00, 0x0b, 0xff, 0xff, 0xf9, 0xc0, 0x00, 0x00, 0x00, 0x3f, 0xff, 0xff, 0xff, 0xff, 0xff, 0xff, 0x3c, 0x09, 0xff, 0xff, 0xf1, 0x80, 0x00, 0x00, 0x00, 0x7f, 0xff, 0xff, 0xff, 0xff, 0xff, 0xff, 0x1e, 0x08, 0x3f, 0xff, 0xc0, 0x00, 0x00, 0x00, 0x00, 0x7f, 0xff, 0xff, 0xff, 0xff, 0xff, 0xff, 0x1f, 0x08, 0x03, 0xff, 0x00, 0x00, 0x00, 0x00, 0x00, 0x7f, 0xff, 0xff, 0xff, 0xff, 0xff, 0xff, 0x00, 0x08, 0x00, 0x00, 0x00, 0x00, 0x00, 0x00, 0x00, 0x1f, 0xff, 0xff, 0xff, 0xff, 0xff, 0xff, 0x80, 0x1c, 0x00, 0x00, 0x00, 0x00, 0x00, 0x00, 0x00, 0x1f, 0xff, 0xff, 0xff, 0xff, 0xff, 0xff, 0xce, 0x1c, 0x00, 0x00, 0x00, 0x00, 0x00, 0x00, 0x00, 0x1f, 0xff, 0xff, 0xff, 0xff, 0xff, 0xff, 0xfe, 0x1c, 0x00, 0x00, 0x00, 0x00, 0x00, 0x00, 0x00, 0x3f, 0xff, 0xff, 0xff, 0xff, 0xff, 0xff, 0xff, 0x7e, 0x00, 0x00, 0x00, 0x00, 0x00, 0x00, 0x00, 0x7f, 0xff, 0xff, 0xff }; void setup() { // initialize with the I2C addr 0x3C display.begin(SSD1306_SWITCHCAPVCC, 0x3C); // Clear the buffer. display.clearDisplay(); // Display bitmap display.drawBitmap(0, 0, MarilynMonroe, 128, 64, WHITE); display.display(); // Invert Display //display.invertDisplay(1); } void loop() {} This is how the output looks like.
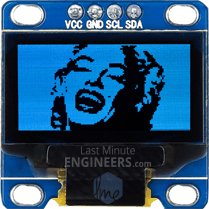
To show bitmap image on the OLED display we need to call drawBitmap() function. It takes six parameters viz. Top left corner X coordinate, top left corner Y coordinate, byte array of monochrome bitmap, width of bitmap in pixels, height of bitmap in pixels and Color.
In our example, the bitmap image is 128×64 in size. So, X & Y coordinates are set to 0 while width & height is set to 128 & 64.
// Display bitmap display.drawBitmap(0, 0, MarilynMonroe, 128, 64, WHITE); display.display(); But, before we can call the drawBitmap() function, we first need an image to draw. Remember, the screen resolution of the OLED display is 128×64 pixels, so images larger than that will not display correctly. To get a correctly sized image, you can use your favorite drawing programs like Inkscape, Photoshop, Paint, etc., setting the canvas size to 128×64 pixels.
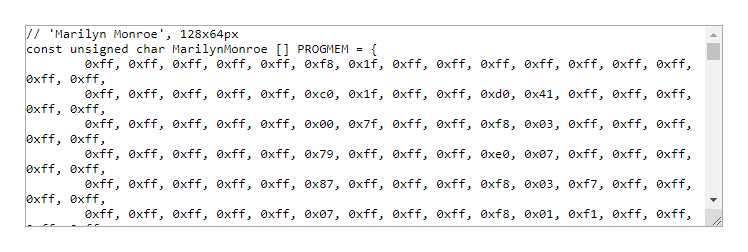
We took laughing Marilyn Monroe image as an example and converted into 128×64 pixels using Paint and saved as .bmp.
Once you have a bitmap, it's time to convert it into an array that the SSD1306 OLED controller can understand. This can be done using two ways: Online method using image2cpp and Offline method using LCD Assistant.
Online Bitmap Array Generator – image2cpp
There's an online application called image2cpp – http://javl.github.io/image2cpp/ which can convert your image into an array. Image2cpp is newer and much more powerful than LCD Assistant (later solution). It will allow you to:
- Convert multiple images simultaneously.
- Scale your image file – Stretch/Scale to fit/Original
- Adjust the Brightness threshold between black and white.
- Re-center the image vertically and / or horizontally.
- Reverse image colors
This tool is so powerful that it can work offline as well. Simply save the page to your PC and open it in your browser. Thanks to Jasper van Loenen for his excellent contribution.
To begin with, open image2cpp in your browser and select any image you want to display on OLED screen.

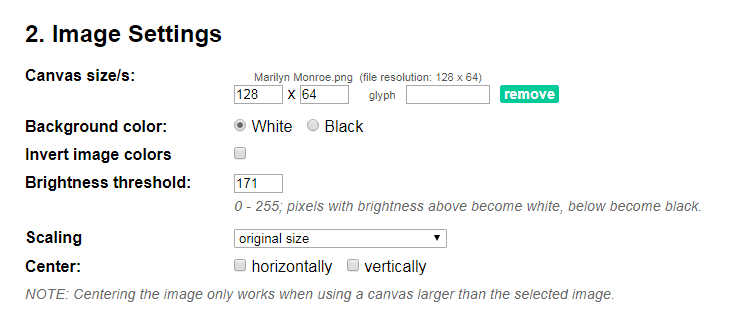
The dimensions of your image will populate in Canvas size option under Image settings. If you have selected bigger image than 128×64, change it to 128×64 and select proper Scaling option. You can view the output in Preview section.
You can change the Background color or Invert image colors if necessary.
Finally, change the most important option – Brightness threshold as per your requirement. Setting threshold will make pixels above this level white and below black. In our case we have set it to 171 to get nice details of Marilyn Monroe.
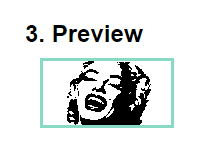
This little preview reflects whatever changes you make in your settings. You can change settings while keeping eye on it.
Once you are satisfied with the outcome, you can proceed generating the data array. Simply select Code output format as Arduino Code and click on Generate code button.
Just for your information, there's an option called Draw mode. It actually creates image according to the scanning patter of the display. If your image looks all messed up on your display, try changing the mode.
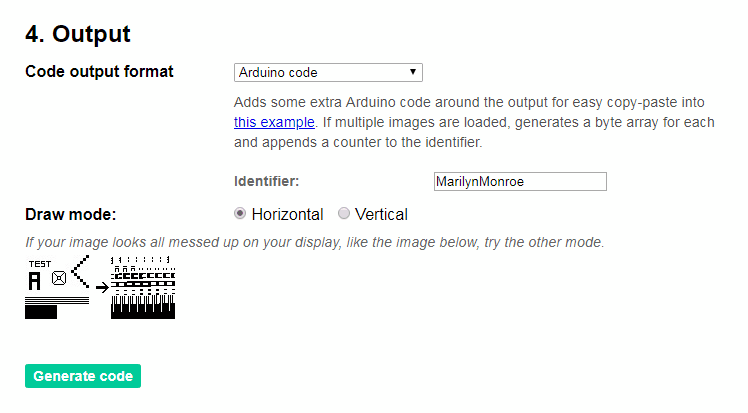
That's it. The byte array of your bitmap will be generated. You can use the output directly with our example code. Just be sure to name it appropriately. Then call your array inside the drawBitmap() function.
Offline Bitmap Array Generator – LCD Assistant
There's another application called LCD assistant – http://en.radzio.dxp.pl/bitmap_converter/ which can convert your bitmap image into data array. It's not as powerful as image2cpp but still popular among hobbyists.
To start with, you need to convert you image into 128×64 1-bit monochrome bitmap. You can use your favorite drawing programs like Inkscape, Photoshop, Paint, etc. to do it, just like we did in MS paint.
Open your file in MS Paint and resize it to 128×64.
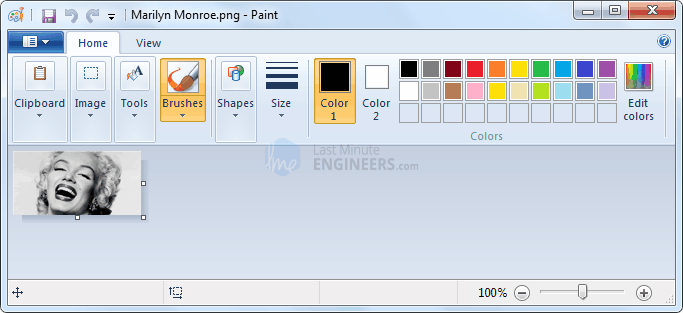
Now, save your file as bitmap. While saving the file choose Save as type : Monochrome Bitmap(*.bmp;*.dib). This will generate 1-bit/binary bitmap image that has only two possible values for each pixel i.e. 0 (black) or 1 (white).
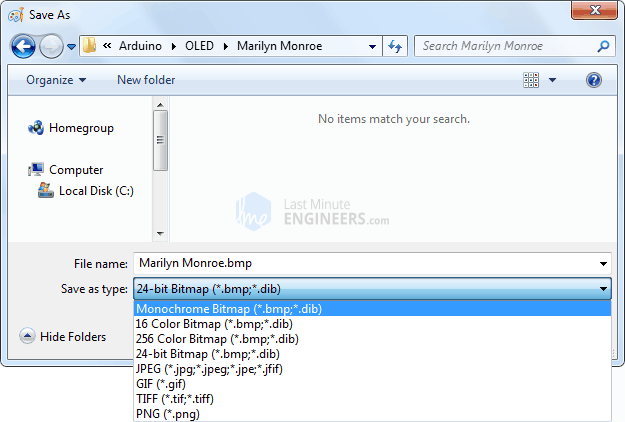
The only downside here is that you cannot set brightness threshold level. It is set to 50% by default and cannot be changed.
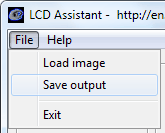
Anyways now, download LCD assistant program. Open the executable and load your bitmap from File menu.
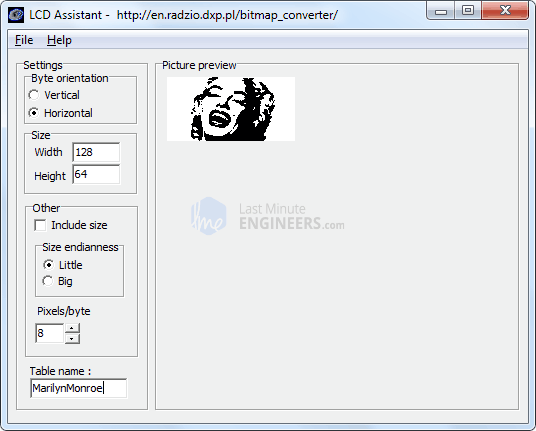
There's nothing much you can do with this tool. So, just go to File menu and click on Save output option. Save the file as text file.
Just for your information, there's an option called Byte Orientation. It actually creates image according to the scanning patter of the display. If your image looks all messed up on your display, try changing the mode.
That's it. With your array created, paste it into your code.
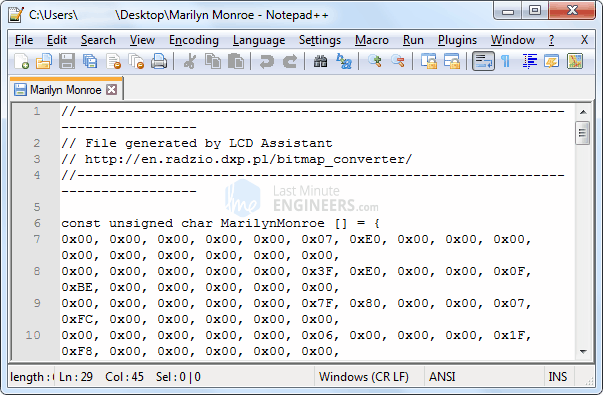
Just be sure to name it appropriately. Then call your array inside the drawBitmap() function.
Source: https://lastminuteengineers.com/oled-display-arduino-tutorial/
0 Response to "Programming a 128 X 64 Blue and Yellow Oled Arduino"
Post a Comment